Have you ever dreamed of crafting your own kitchen cabinet from scratch? Imagine the satisfaction of saying, “I built this myself!”
When someone admires your handiwork. In this DIY guide, you’ll discover the step-by-step process to transform raw materials into a stunning kitchen cabinet.
Whether you’re a seasoned DIY enthusiast or a curious beginner, this guide will empower you to take control of your kitchen design.
You’ll learn essential tips and tricks that make the process manageable and enjoyable. So, roll up your sleeves and get ready to dive into a project that not only enhances your space but also boosts your confidence in your DIY skills.
Stick with us, and you might just find yourself eager to tackle more projects around your home. Let’s get started!
Key Takeaways
Planning And Design
Crafting a kitchen cabinet begins with careful planning and design. Consider the space and style you want. Use quality materials and precise measurements for a sturdy build.
Planning and designing a kitchen cabinet from scratch can be an exciting yet challenging task. This phase sets the foundation for the entire project, dictating the outcome of your DIY endeavor.
Thoughtful preparation here can save time, resources, and potential headaches down the line.
Understanding Your Space
Before diving into the design, get familiar with your kitchen space. Measure the area where you plan to install the cabinets.
Consider the dimensions of your kitchen and how new cabinets will fit into the existing layout. Think about the flow of your kitchen.
Will the cabinet placement allow for easy access to frequently used items? This is your chance to optimize your kitchen’s functionality.
Choosing The Right Materials
Materials can make or break your cabinet project. Choose quality materials that fit your budget. Plywood is a popular choice due to its strength and affordability.
Don’t forget about the finish. A good finish not only enhances the appearance but also extends the life of your cabinets. Have you considered the long-term maintenance of the materials you choose?
Designing For Functionality
Design isn’t just about aesthetics; it’s also about functionality. Decide how many shelves and drawers you need.
Think about what you store in your cabinets and design accordingly. Consider adding adjustable shelves for flexibility. Will you need specialized storage like spice racks or pull-out bins? Tailor the design to your cooking habits.
Sketching Your Design
Put your ideas on paper. Sketching helps visualize the final product and is a great reference during construction.
You don’t need to be an artist; simple drawings can suffice. Label each part clearly in your sketch. Include dimensions and note where each piece will fit. This step can prevent costly mistakes later.
Consulting With Experts
Even if you’re a DIY enthusiast, consulting with a professional can offer new insights. They can provide tips that only come with experience.
A short consultation might reveal design flaws you hadn’t considered. Have you ever thought about how a simple discussion could save you time and money? It’s worth considering before you start cutting wood.
Materials And Tools
Crafting a kitchen cabinet involves essential materials and tools like plywood, screws, a saw, and a drill.
A tape measure ensures precise dimensions, while sandpaper provides a smooth finish. Basic safety gear like goggles and gloves protects during this DIY project.
Creating a kitchen cabinet from scratch is a rewarding DIY project that combines creativity with practicality.
Before you start, it’s important to gather the right materials and tools to ensure a smooth process. Getting these essentials ready will make your project more efficient and enjoyable.
Materials You Will Need
Begin by selecting the right wood for your kitchen cabinet. Plywood is a popular choice due to its strength and affordability.
Consider the thickness you need; typically, 3/4-inch plywood works well for most cabinets. Think about the finish you want.
Do you prefer a painted look or a natural wood finish? You’ll need either paint or stain and varnish accordingly.
Don’t forget the hinges, handles, and screws to complete your cabinet. Quality hardware can elevate the overall appearance and durability of your project.
Tools Required For The Job
A good set of tools is your best friend in DIY projects. You’ll need a circular saw to cut your plywood to size. A drill is essential for making holes for screws and attaching hardware.
Sandpaper is crucial for smoothing edges and surfaces before painting or staining. If you don’t have a power sander, a sanding block will work too. A tape measure is indispensable to ensure accuracy in your dimensions.
Safety Equipment
Safety should always be a priority. Protect your eyes with safety goggles when cutting and sanding. Use ear protection if you’re working with loud power tools.
Gloves can protect your hands from splinters and harsh chemicals in paint or varnish. Do you have a first aid kit nearby? It’s always better to be prepared for any minor injuries.
Organizing Your Workspace
A well-organized workspace can make a big difference. Clear a large area where you can lay out your materials and tools.
Having a clutter-free space not only makes work easier but also safer. Use a workbench or sturdy table to support your materials as you cut and assemble.
Keep your tools within arm’s reach to avoid unnecessary trips across the workspace. How often have you wasted time searching for a misplaced tool? A little organization goes a long way.
Personal Experience And Tips
When I made my first kitchen cabinet, I underestimated the importance of a sharp saw blade.
A dull blade makes cutting more difficult and can ruin the wood’s edge. Always check your tools before starting.
Another tip is to double-check your measurements before cutting. Mistakes in measurements can lead to wasted materials and frustration. Remember, measure twice, cut once.
What’s one tool or material you didn’t know you needed until you started your project? Share your thoughts in the comments!
Building The Frame
Building the frame of your kitchen cabinet is a crucial step. It sets the foundation for the entire structure.
A strong frame ensures durability and longevity. You don’t need to be a professional carpenter to do this. With the right tools and materials, anyone can build a solid frame.
Choosing The Right Wood
Select quality wood for your cabinet frame. Pine or plywood are great options. These materials are sturdy and easy to work with.
Ensure the wood is straight and free from knots. This will prevent any structural issues later on.
Measuring And Cutting
Accurate measurements are key to a perfect fit. Use a tape measure and double-check each measurement.
Mark your wood carefully before cutting. A circular saw will give clean, straight cuts. Precision is crucial for aligning the pieces.
Assembling The Frame
Lay out your cut pieces on a flat surface. Align them to form the cabinet shape. Use wood glue to hold the joints together temporarily.
Secure each joint with screws for extra strength. A power drill makes this step quick and efficient.
Ensuring Stability
Check the frame for any wobbling or misalignment. Adjust as necessary to ensure stability. Add corner braces for additional support. This keeps the frame square and stable.
Sanding And Finishing
Sand the frame to remove rough edges. A smooth surface is important for a neat finish. Use fine-grit sandpaper for best results. Once sanded, apply a wood finish or primer. This protects the wood and prepares it for painting.
Creating Doors And Drawers
Creating doors and drawers is a crucial step in building kitchen cabinets. These components add functionality and style to the cabinet. This section will guide you on crafting sturdy and appealing doors and drawers from scratch.
Understanding The Types Of Cabinet Doors
Cabinet doors come in various styles. Choose between flat panel, raised panel, and slab doors. Flat panel doors have a simple design, while raised panel doors offer a classic look. Slab doors are modern and sleek.
Materials Needed For Doors And Drawers
Pick high-quality wood for durability. Plywood is an excellent choice for cabinet doors. It resists warping and holds paint well. Use solid wood for drawer fronts for an elegant finish.
Measuring And Cutting For Perfect Fit
Measure the cabinet openings accurately. Precision ensures doors and drawers fit snugly. Cut wood pieces using a circular saw. Double-check measurements before cutting.
Assembling The Doors
Join wood pieces using glue and clamps. Ensure alignment is perfect. Reinforce joints with screws for added strength. Sand edges smooth for a clean look.
Building The Drawers
Construct the drawer box using plywood. Secure corners with dovetail joints for stability. Install drawer slides for smooth opening and closing.
Finishing Touches
Apply primer and paint for a polished look. Choose colors that match your kitchen theme. Install handles and knobs for easy access.
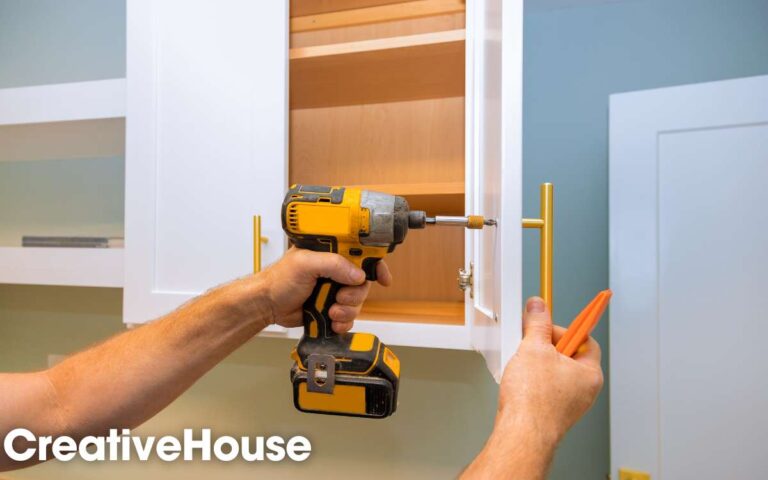
Installing Doors And Drawers
Attach hinges to doors. Align them with cabinet frames. Install drawers by sliding them into place. Test movement to ensure functionality.
Finishing Techniques
Creating your own kitchen cabinet is a rewarding experience. The final step is the finishing techniques.
This step transforms raw materials into a polished cabinet. Proper finishing adds durability and beauty to your project. Explore these techniques to enhance your cabinet’s appearance.
Painting And Varnishing
Paint offers a fresh look and protects surfaces. Choose a color that matches your kitchen decor. Apply a primer first for smooth application.
Use a brush or roller for even coverage. Varnishing seals the wood and highlights natural grain. Select a clear varnish for a glossy finish. Apply two to three coats for durability.
Staining
Staining enriches the wood’s natural color. Pick a stain that complements your kitchen’s style. Apply the stain with a clean cloth or brush. Rub it in gently along the wood grain. Let it dry completely before adding a protective layer.
Distressing
Distressing gives cabinets a vintage charm. Use sandpaper to roughen edges and surfaces.
Lightly scrape areas to create a worn look. Apply a glaze for added depth and character. This technique adds personality to your kitchen space.
Waxing
Waxing provides a soft sheen and protection. Choose a high-quality furniture wax. Apply it with a cloth in circular motions. Buff it to a shine for a smooth finish. Waxing is ideal for maintaining a natural wood feel.
Sealing
Sealing prevents moisture and stains from damaging your cabinet. Use a polyurethane sealant for long-lasting protection.
Apply evenly with a brush or spray. Allow each coat to dry thoroughly. Sealing keeps your cabinet looking new over time.
Installation Tips
Installing kitchen cabinets can transform your space. Proper installation ensures durability and functionality. Attention to detail is key during this phase. Let’s explore some essential tips.
Measure Twice, Cut Once
Accurate measurements prevent mistakes. Double-check dimensions before cutting materials. This saves time and resources. Use a tape measure for precision. Measure the height, width, and depth carefully.
Start With The Upper Cabinets
Upper cabinets are installed first. This avoids interference with lower cabinets. Use a level to ensure straight alignment. Secure cabinets firmly to the wall. Check for sturdy attachment.
Use Quality Fasteners
Choose durable fasteners for longevity. Screws and anchors should be reliable. Ensure they can bear the weight. Poor quality may lead to loose cabinets. Proper fastening is crucial for safety.
Ensure Proper Alignment
Alignment impacts aesthetics and functionality. Use a level for horizontal and vertical lines. Adjust as needed. Misalignment can cause doors to jam. Properly aligned cabinets look professional.
Check For Plumb And Level
Ensure cabinets are plumb and level. This keeps everything balanced. Use a spirit level for accuracy. Make adjustments if necessary. This prevents future structural issues.
Secure Cabinets To Studs
Attach cabinets to wall studs. This provides strong support. Locate studs using a stud finder. Screws should penetrate the stud firmly. Avoid securing cabinets only to drywall.
Adjust Hinges And Handles
Check hinges and handles after installation. Ensure smooth operation. Tighten loose screws. Test cabinet doors for easy movement. Proper adjustment enhances usability.
Inspect For Gaps
Look for gaps between cabinets and walls. Fill gaps with caulk or trim. This improves the finish. Gaps can cause dust accumulation. Proper sealing keeps your kitchen clean.
FAQ Of How to Make a Kitchen Cabinet from Scratch
Is It Cheaper To Build Your Own Kitchen Cabinets Or Buy Them?
Building kitchen cabinets yourself is often cheaper. DIY saves labor costs, but requires time and skills. Buying pre-made cabinets offers convenience and professional finish but costs more. Consider your budget, expertise, and time availability. Customization options vary with each choice, impacting overall expenses.
How To Make A Cabinet Step By Step?
1. Gather materials: wood, screws, hinges, and tools. 2. Measure and cut wood pieces accurately. 3. Assemble the frame using screws. 4. Attach hinges and doors securely. 5. Sand, paint, or stain for a finished look.
Can A Beginner Make Kitchen Cabinets?
Yes, beginners can make kitchen cabinets with patience and basic woodworking skills. Start with a simple design and gather necessary tools. Online tutorials and DIY guides offer helpful instructions. Practice safety measures and take time to learn. Gradually, skills improve, leading to better results.
What Is The Best Wood For Diy Cabinets?
Maple, oak, and birch are excellent choices for DIY cabinets. They offer durability and a smooth finish. Maple is ideal for a modern look, while oak provides a classic appearance. Birch is budget-friendly and easy to work with. These woods ensure sturdy, long-lasting cabinets.
Conclusion
Crafting your kitchen cabinet from scratch is rewarding. You gain a unique piece. Plus, you save money. You also learn new skills.
This DIY project allows creativity. Choose materials and designs you love. Follow the steps carefully. Safety is crucial, so wear protective gear.
Don’t rush the process. Patience ensures quality. Celebrate your completed cabinet with pride.
Share your journey with friends. Inspire others to try DIY projects too. Enjoy your beautiful, handcrafted kitchen cabinet.