Many homeowners find that gutters can start to leak, especially where different sections meet. It can seem like a big job to fix, and you might think you need to
Key Takeaways
- Learn simple methods to seal gutter joint leaks effectively.
- Discover the tools and materials needed for a quick repair.
- Understand how to prepare the gutter joint for patching.
- Find out how to apply sealant for a lasting fix.
- Know when a simple fix is enough and when to call a pro.
- Gain confidence in handling basic gutter maintenance yourself.
![How to Fix a Leaking Gutter Joint Without Replacing It[1]](https://creativehouseblog.com/wp-content/uploads/2026/05/How_to_Fix_a_Leaking_Gutter_Joint_Without_Replacing_It1.jpg)
Understanding Gutter Leaks
Why Gutters Leak at the Joints
Gutters are made of long sections connected together. These connections, or joints, are common places for water to sneak out.
This happens for a few reasons. Over time, the seals can dry out and crack. Rainwater, debris like leaves and twigs, and even extreme weather can put stress on these joints.
This stress can cause the seals to loosen or break. When this happens, water finds its way through, leading to leaks.
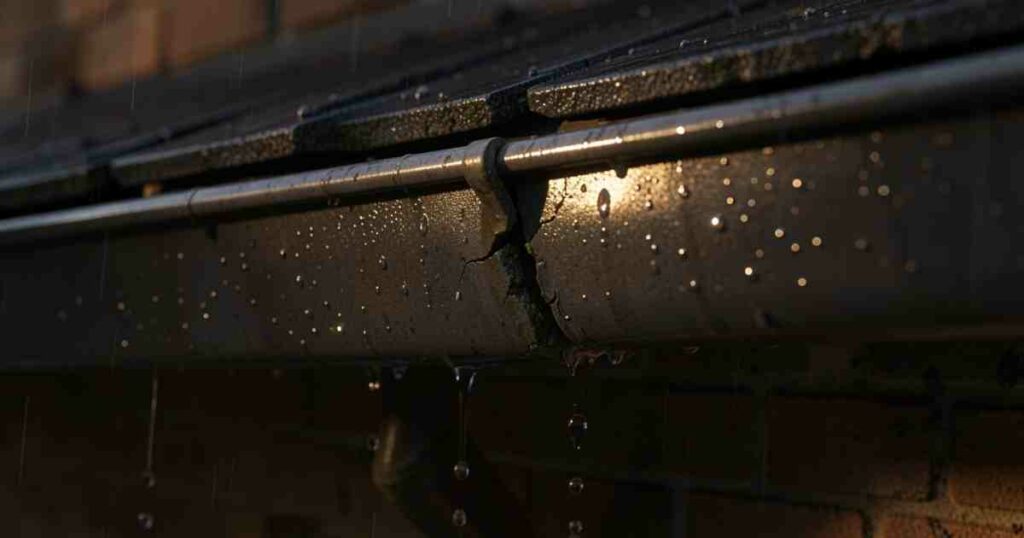
You might see water dripping down your walls or pooling near your home’s foundation. Addressing these leaks early is important to prevent bigger problems.
The Importance of Fixing Gutter Joint Leaks
Fixing a leaky gutter joint right away is really important. If you let it go, the constant water can damage your home. It can cause problems with your roof, walls, and even your basement.
Water can soak into the wood of your house, leading to rot. It can also find its way into your foundation, causing cracks and making your basement damp.
This can be a costly issue to fix later. Plus, a well-working gutter system helps keep your yard from flooding.
This protects your landscaping and helps water drain away from your house where it belongs.
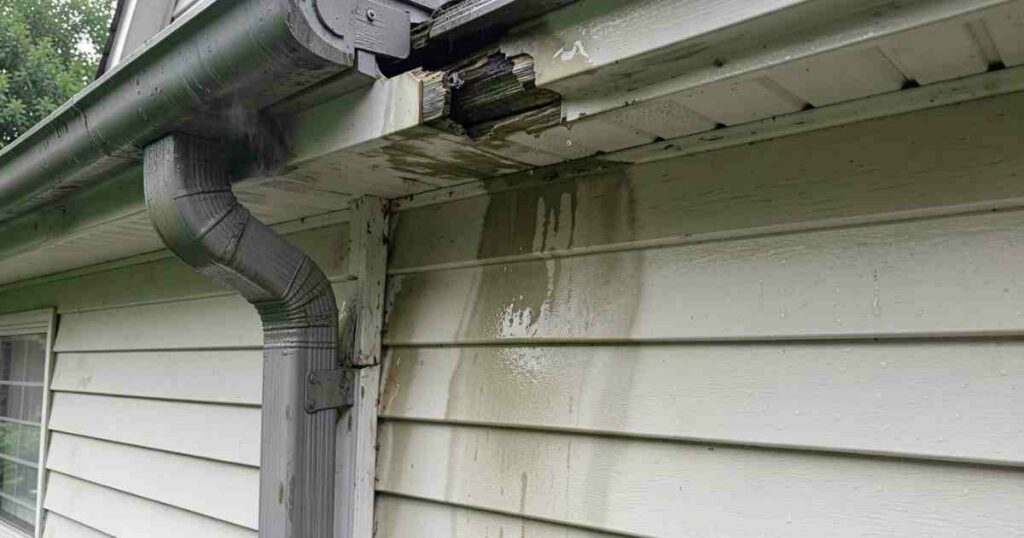
Signs of a Leaking Gutter Joint
You can often spot a leaky gutter joint easily. Look for water dripping from the seam where two gutter pieces meet.
You might also see streaks of dirt or dark marks running down the side of the gutter at the joint.
Sometimes, you’ll see moss or algae growing in areas where water is constantly wet. If you notice rust stains on your siding below the joint, that’s another clue.
Even if you don’t see active dripping, puddles of water on the ground directly under the joint are a clear sign. Keep an eye out for these signs after it rains.
How to Fix a Leaking Gutter Joint Without Replacing It
Gathering Your Repair Supplies
Before you start, make sure you have everything you need. You’ll want a sturdy ladder to reach your gutters safely.
Always have someone spot you when you’re on a ladder. You’ll need a wire brush and sandpaper to clean the area. A caulk gun is necessary for applying sealant. For sealing, you’ll need gutter sealant or caulk.
Look for a product made specifically for outdoor use and that is waterproof and flexible. Sometimes, gutter repair tape or a patch kit can also be helpful. Gloves and safety glasses are a good idea to protect yourself.
Preparing the Gutter Joint
Cleaning is the most important first step. You need a clean, dry surface for the sealant to stick well.
Use your wire brush to scrub away any dirt, rust, or old, loose caulk from the leaking joint. Get into any small cracks.
After brushing, wipe the area down with a clean cloth. If there’s still dust or debris, a damp cloth can work, but make sure the joint dries completely before you apply sealant.
Any moisture will prevent the sealant from bonding properly. Patience here will give you a longer-lasting repair.
Applying Gutter Sealant
Now you’re ready to apply the sealant. Cut the tip of the sealant tube at a slight angle. This creates a small opening for a steady bead of sealant.
Put the tube into your caulk gun. Carefully apply a generous, continuous bead of sealant along the inside and outside of the leaking joint. Make sure to cover the entire seam where the two pieces of gutter meet.
Use your finger or a putty knife to smooth the sealant into the crack, pressing it firmly. You want to create a watertight barrier. It’s better to use a bit too much sealant than not enough.
Testing Your Repair
After applying the sealant, you need to let it cure properly. Check the sealant tube for drying times.
This usually takes a few hours, but it can vary. Once it's dry to the touch, you can test your repair. Get a hose and gently spray water onto the roof above the repaired joint. Watch closely to see if any water still leaks out. If you see a small drip, you might need to apply another layer of sealant.
Ensure the area is dry before adding more. A successful test means your gutter is ready to handle rain again.
When to Consider Professional Help
While many gutter leaks are simple fixes, sometimes the problem is bigger. If your gutters are sagging badly or have large holes, a simple seal might not be enough.
If you’ve tried to fix a leak and it keeps coming back, it could mean there’s a larger issue with the gutter system.
Also, if the leaks are causing significant damage to your home, like rotten wood or foundation problems, it’s time to call a professional.
They have the tools and expertise to assess the full extent of the damage and make more complex repairs. Your safety is also key; if you’re uncomfortable working on a ladder, it’s always best to get help.
Common Gutter Materials and Their Sealant Needs
Different Gutter Materials
Gutters are typically made from a few common materials: aluminum, vinyl, and galvanized steel.
Each material has its own characteristics that might slightly affect how you repair it, but the basic principles are the same.
Aluminum gutters are lightweight and popular. Vinyl gutters are also lightweight and often easier to install yourself. Steel gutters are stronger but can rust if the protective coating is damaged.
Knowing what your gutters are made of can help you choose the right sealant. Most sealants work on all these materials.
Choosing the Right Sealant
For most DIY repairs, a high-quality exterior caulk or gutter sealant is the best choice. Look for products labeled as “gutter sealant,” “roof sealant,” or “exterior gap filler.”
These are designed to be waterproof and flexible, which is crucial for gutter repairs. They need to withstand temperature changes and keep a tight seal.
Polyurethane-based sealants are often recommended for their durability and adhesion. Silicone sealants can also work, but ensure they are rated for outdoor use and are paintable if you plan to match the gutter color. Avoid standard indoor caulks, as they won’t hold up to the weather.
Sealant Application Techniques for Different Materials
When applying sealant to aluminum or vinyl gutters, ensure the surface is clean and dry. These materials are generally smooth, so a good bead of sealant that bridges the gap is effective.
For galvanized steel, pay extra attention to any rust spots. You might need to sand these down and potentially apply a rust-inhibiting primer before sealing, though for minor leaks, thorough cleaning is often enough.
The key is creating a continuous, watertight bond. Regardless of the material, don’t rush the application. A smooth, even bead will provide the best protection.
Proper Curing and Weather Considerations
The sealant needs time to cure, or harden, properly before it can protect against water. Most sealants require at least 24 hours of dry weather to cure fully.
Check the product instructions for specific times. It’s also important to consider the temperature.
Extreme heat or cold can affect how well the sealant cures and bonds. Ideally, you should make repairs on a day with mild temperatures, typically between 50 and 80 degrees Fahrenheit (10-27 degrees Celsius).
Avoid applying sealant if rain is expected within the next 24-48 hours, as this can wash away uncured sealant.
Troubleshooting Common Repair Issues
Sealant Not Sticking
If you find that your sealant isn’t sticking or is peeling away soon after application, the problem usually lies in the preparation.
The surface of the gutter joint might not have been clean enough, or it wasn’t completely dry. Oils, dirt, or even old, loose caulk can prevent the new sealant from adhering properly.
Another cause could be using the wrong type of sealant. If it wasn’t designed for outdoor, wet environments, it won’t last.
Always re-clean the area thoroughly, ensuring it’s dry, and reapply a high-quality, exterior-grade sealant.
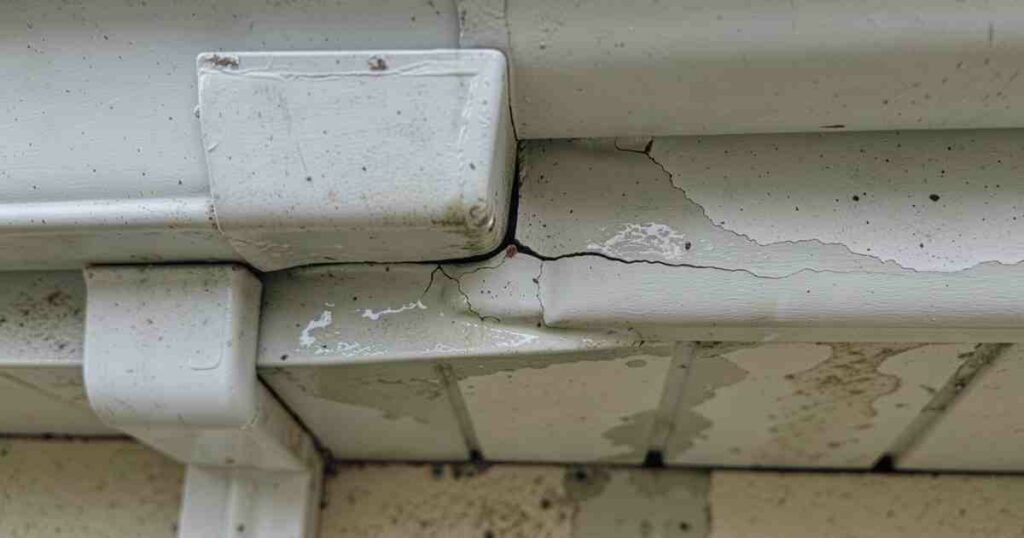
Cracks Appearing in the Sealant
Small cracks can appear in sealant over time due to the expansion and contraction of the gutters with temperature changes.
If the sealant itself is old or of poor quality, it might become brittle and crack more easily. Also, if the initial repair didn’t fully bridge the gap, the stress on the sealant can cause it to crack.
For a lasting fix, ensure you use a flexible sealant and apply a generous amount that completely covers the joint. If you see cracks, it’s a sign that the seal is compromised and needs to be redone.
Persistent Leaking Despite Repairs
If you’ve repaired a leaking joint multiple times and it still leaks, the problem might be more significant than just a faulty seal.
The gutter section itself might be bent or damaged, creating a gap that’s too large for sealant alone. It’s also possible that the joint connector is damaged or loose.
In these cases, you might need to consider more robust solutions, such as replacing the damaged section of the gutter or reinforcing the joint with a metal bracket and sealant. This is often when it’s best to consult a professional gutter service.
Extending the Life of Your Gutter System
Regular Gutter Cleaning
One of the best ways to keep your gutter joints from leaking is to clean them regularly. Leaves, twigs, and other debris can clog your gutters.
When gutters are blocked, water can back up and pool, putting extra pressure on the joints.
This constant moisture can also weaken the seals over time. Aim to clean your gutters at least twice a year, once in the spring and again in the fall.
You can use a small trowel or a specialized gutter cleaning tool to scoop out the debris. Remember to wear gloves and use a ladder safely.
Annual Inspections
Beyond just cleaning, schedule an annual inspection of your entire gutter system. This means looking for loose hangers, signs of rust or damage, and any areas that look like they might start to leak.
Check the downspouts too, to make sure they are clear and properly attached. If you notice any minor issues, like a slightly loose joint or a small crack starting to form, you can address it right away.
Catching small problems early can prevent them from becoming big, expensive repairs and will help you avoid needing to know How to Fix a Leaking Gutter Joint Without Replacing It as often.
Gutter Guards
Gutter guards, also called gutter covers or gutter screens, can be a great investment. They are installed over your gutters and prevent large debris like leaves and twigs from getting in.
This reduces the amount of cleaning you need to do and helps keep water flowing freely. By keeping debris out, they lessen the stress on your gutter joints.
While they don’t eliminate the need for occasional maintenance, they significantly cut down on clogs and the problems they cause. This means fewer chances for water to sit and damage your gutter seams.
Protecting Your Foundation
Properly functioning gutters are vital for protecting your home’s foundation. When gutters leak at the joints, water can drip down the side of your house and collect around the base.
This excess moisture can seep into the soil, causing it to expand. As the soil expands and then dries out, it can shift, leading to cracks in your foundation.
Over time, this can cause serious structural damage to your entire home. Fixing those small leaks at the joints is a simple step that plays a big role in preserving the integrity of your home’s foundation.
Frequently Asked Questions Of How to Fix a Leaking Gutter Joint Without Replacing It
Question: What is the best time of year to fix a leaking gutter joint?
Answer: The best time to fix a leaking gutter joint is when the weather is dry and mild, typically in the spring or fall. Avoid making repairs when it’s raining or when extreme temperatures are expected.
Question: How long does gutter sealant usually last?
Answer: A properly applied high-quality exterior gutter sealant can last anywhere from 5 to 10 years, depending on the product, climate, and exposure to the elements.
Question: Can I use silicone caulk to fix a gutter leak?
Answer: While some silicone caulks can work, it’s best to use a sealant specifically designed for outdoor use and for gutters. Look for a flexible, waterproof, and UV-resistant product for the most durable results.
Question: Do I need special tools to fix a leaking gutter joint?
Answer: You’ll need basic tools like a ladder, wire brush, sandpaper, a caulk gun, and the gutter sealant. These are common household items or readily available at hardware stores.
Question: What happens if I don’t fix a leaking gutter joint?
Answer: If left unfixed, a leaking gutter joint can lead to water damage to your home’s siding, foundation, and landscaping. It can also cause mold growth and wood rot.
Summary
Knowing How to Fix a Leaking Gutter Joint Without Replacing It is a practical skill. You can easily repair these leaks with simple steps. Clean the area well, apply a good sealant, and let it dry.
This saves you money and keeps your home safe from water damage. Don’t let small leaks become big problems; tackle them with confidence!
![High Speed Versus Regular Blenders Explained[1]](https://creativehouseblog.com/wp-content/uploads/2026/03/High-Speed_Versus_Regular_Blenders_Explained1-768x448.jpg)
![10 Foods You Should Never Store In A Freezer[1]](https://creativehouseblog.com/wp-content/uploads/2026/04/10_Foods_You_Should_Never_Store_In_A_Freezer1-768x448.jpg)
![7 Deep Fryer Mistakes That Make Food Soggy[1]](https://creativehouseblog.com/wp-content/uploads/2026/04/7_Deep_Fryer_Mistakes_That_Make_Food_Soggy1-768x448.jpg)
![How Powerful Should a Stand Mixer Be[1]](https://creativehouseblog.com/wp-content/uploads/2026/03/How_Powerful_Should_a_Stand_Mixer_Be1-768x448.jpg)
![Air Fryer Cooking Times Guide Explained Simply[1]](https://creativehouseblog.com/wp-content/uploads/2026/03/Air_Fryer_Cooking_Times_Guide_Explained_Simply1-768x448.jpg)
![Troubleshooting Common Espresso Machine Issues[1]](https://creativehouseblog.com/wp-content/uploads/2026/03/Troubleshooting_Common_Espresso_Machine_Issues1-768x448.jpg)