Many people find it tricky to keep their homes warm and dry, especially when chilly winds blow or rain falls.
Fixing window seals seems like a big job for beginners, but it’s actually quite simple. You can stop annoying draughts and pesky dampness by taking a few easy steps.
This guide will walk you through it, showing you exactly what to do so your home stays cozy and dry all year round.
Let’s get started on improving your home’s comfort by learning How to Maintain Window Seals to Prevent Draughts and Damp.
Key Takeaways
- Identify common signs of failing window seals.
- Learn the simple tools needed for seal maintenance.
- Discover how to clean and prepare window seals.
- Understand different methods for repairing or replacing seals.
- Recognize the benefits of well-maintained window seals for your home.
- Know when to call a professional for window seal issues.
![How to Maintain Window Seals for Fewer Draughts and Damp[1]](https://creativehouseblog.com/wp-content/uploads/2026/05/How_to_Maintain_Window_Seals_for_Fewer_Draughts_and_Damp1.jpg)
Why Window Seals Matter for Your Home
Window seals are the unsung heroes of your home’s comfort and health. They act like a barrier, keeping outside air from getting in and inside air from escaping.
When these seals start to fail, your home can become drafty, making it harder to stay warm in winter and cool in summer.
This constant struggle to regulate temperature leads to higher energy bills because your heating and cooling systems have to work overtime.
Beyond just comfort and cost, damaged window seals can cause bigger problems. Moisture from outside can seep in, leading to damp spots on your walls or window frames. This dampness is a perfect breeding ground for mold and mildew.
Mold is not only unsightly but also bad for your health, especially for people with allergies or breathing problems.
Keeping your window seals in good shape is a smart way to protect your home and your well-being.
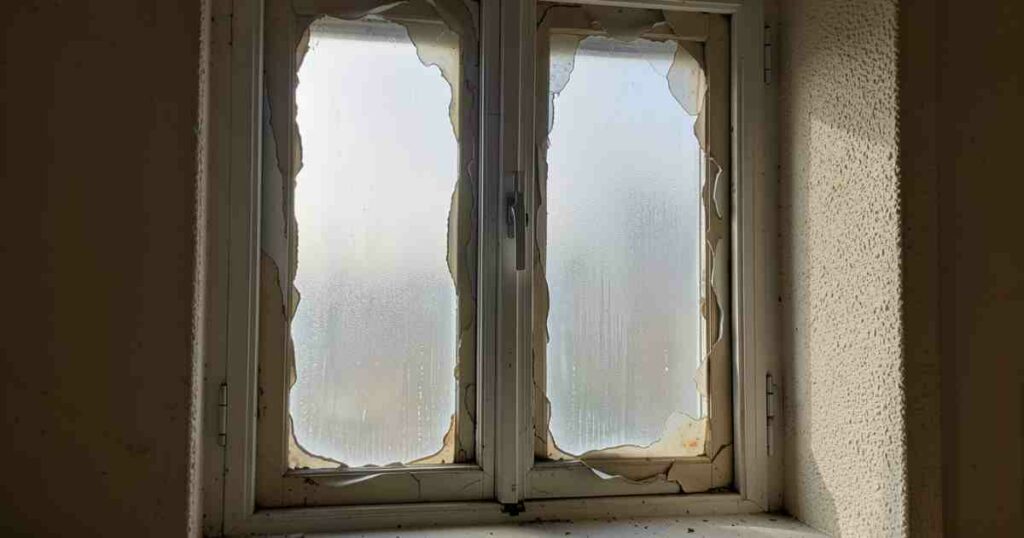
Signs of Worn-Out Window Seals
Spotting the signs of worn-out window seals is the first step in fixing them. One of the most obvious signs is feeling a cool breeze coming from your windows, even when they are closed. This is a draught, and it means the seal is no longer creating a tight barrier.
You might also notice condensation forming on the inside of your window panes. This can happen between double-paned windows if the seal has broken, letting moist air get into the gap.
On the outside, look for visible cracks, gaps, or pieces of sealant that are peeling away or have fallen off.
Inspect the frame of your window as well. If you see signs of rot, water damage, or discoloration around the edges, it could be that water has been seeping in through faulty seals.
Keep an eye out for these clues, and you can tackle window seal issues before they become major problems.
How Drafts Affect Your Home
Drafts are more than just an annoyance; they are a sign that your home is losing energy. Imagine your warm air escaping like a leaky balloon. This forces your heater to work harder to maintain a comfortable temperature.
In the summer, the opposite happens; cool air escapes, and warm air creeps in, making your air conditioner run constantly.
This continuous effort by your HVAC system uses more electricity or gas, leading to higher utility bills.
Studies show that air leaks from windows and doors can account for a significant portion of a home’s energy loss.
Fixing these leaks is a direct way to save money and make your home more energy efficient.
Dampness and Mold Growth
When window seals fail, they allow moisture to enter your home. This is especially true during rainy seasons or in humid climates. This moisture can settle on window sills, frames, and even nearby walls, creating damp spots.
These damp areas are ideal for mold and mildew to grow. Mold is a type of fungus that thrives in dark, moist environments.
Its spores can spread through the air, posing health risks such as allergies, asthma attacks, and other respiratory issues.
Preventing dampness by maintaining window seals is key to a healthy indoor environment.
Gathering Your Window Seal Maintenance Tools
Before you start, having the right tools makes the job much easier and more effective. You don’t need a lot of specialized equipment, and most of these items are likely already in your home or can be found at any hardware store.
For cleaning, you’ll want a soft cloth or sponge, some mild soap or detergent, and clean water.
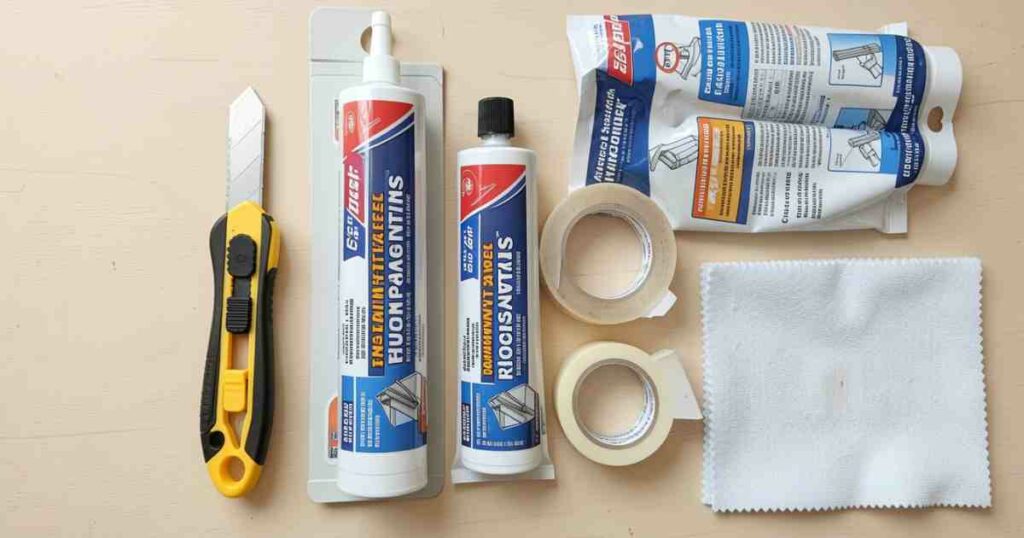
A stiff brush, like an old toothbrush or a small cleaning brush, can help get into tight spots. For removing old sealant, a putty knife or a utility knife works well.
Don’t forget safety gear like gloves to protect your hands.
If you plan to apply new sealant, you’ll need a caulk gun and the appropriate type of sealant for windows and doors.
Choosing the right sealant is important, so check product labels to ensure it’s suitable for outdoor use and can withstand different weather conditions.
Having everything ready beforehand ensures you can complete the task without interruption.
Essential Cleaning Supplies
Cleanliness is key when preparing window seals for repair or maintenance. You’ll need a bucket of warm water mixed with a little bit of mild dish soap. A soft cloth or sponge will be your primary tool for wiping away dirt and grime.
For stubborn dirt or mildew, a small brush can be very helpful. An old toothbrush is perfect for getting into the small grooves and crevices of the window frame and seal. Make sure to rinse your cloth or sponge frequently to avoid just spreading the dirt around.
After washing, rinse the area thoroughly with clean water. It’s important to remove all soap residue, as it can prevent new sealant from sticking properly.
Finally, allow the seals and frames to dry completely before moving on to the next step.
A dry surface ensures the best adhesion for any new materials you use.
Tools for Seal Removal and Application
If your old window seals are damaged beyond repair, you’ll need to remove them first. A putty knife or a razor blade can be used carefully to scrape away old caulk or weatherstripping. Be gentle to avoid scratching the window frame itself.
Once the old material is gone and the area is clean, you’ll need a caulk gun for applying new sealant.
Choose a high-quality, exterior-grade caulk that is flexible and waterproof. Silicone or acrylic latex caulk are common choices for windows.
When using the caulk gun, apply a steady, even bead of sealant along the gap. It’s better to apply a little too much and smooth it out than to have gaps. You can use a damp cloth or a caulk smoothing tool to create a neat, finished edge.
Proper application ensures a tight seal that will last.
Choosing the Right Sealant Material
Selecting the correct sealant is vital for a long-lasting repair. For exterior window seals, you want a product that can handle changes in temperature and moisture.
Silicone sealants are very durable and waterproof, making them a great choice for areas exposed to rain.
Acrylic latex caulk is another popular option. It’s easier to clean up and can be painted over, which is a plus if you want your repairs to blend in with your home’s exterior. Look for products specifically labeled for “windows and doors” or “exterior use.”
Some sealants are also designed to be flexible. This is important because windows expand and contract with temperature changes.
A flexible sealant will move with the window, preventing cracks and maintaining the seal over time.
Always read the product description to ensure it meets your needs.
Step-by-Step Guide to Maintaining Window Seals
Now that you have your tools and understand why it’s important, let’s walk through how to actually do it.
This process is designed to be easy to follow, even if you’ve never done anything like it before. By following these steps, you can significantly improve your home’s energy efficiency and comfort.
The goal is to create a strong barrier that keeps unwanted air and water out. We’ll start with cleaning, move to inspection, then repair or replacement. Each step builds on the last, ensuring a thorough and effective job.
Remember to take your time and work carefully for the best results.
Step 1 Cleaning the Window Seals
The first step is to thoroughly clean the area around your window seals. Start by removing any loose dirt, cobwebs, or debris with a dry brush or cloth. This will make the washing process easier and more effective.
Next, mix a small amount of mild dish soap with warm water in a bucket. Dip your soft cloth or sponge into the soapy water and gently wipe down the entire seal and the surrounding frame. Pay close attention to any nooks and crannies where dirt might be hiding.
After washing, rinse the area completely with clean water and a fresh cloth. It’s crucial to remove all soap residue, as this can interfere with the adhesion of new sealant. Finally, let the seals and frames air dry completely.
You can speed this up with a clean, dry towel or a fan.
Step 2 Inspecting for Damage
Once the seals are clean and dry, it’s time for a detailed inspection. Carefully run your fingers along the entire length of the seal. Feel for any cracks, holes, or areas where the sealant is pulling away from the glass or frame.
Look closely for any gaps. Even small gaps can let in air and moisture. Check the corners of the windows, as these are often weak points.
If you have double-paned windows, look for any signs of condensation or fogging between the glass panes, which indicates a seal failure.
Also, inspect the window frame itself for any signs of rot or water damage. This damage can often be a result of years of exposure due to a compromised seal. Note down any areas that look problematic.
This inspection will help you decide whether a simple repair or a full replacement is needed.
Step 3 Repairing Minor Gaps and Cracks
For small cracks or minor gaps, you can often perform a simple repair using exterior caulk. Make sure the area is clean and dry before you begin.
Apply a thin, even bead of your chosen exterior caulk along the crack or gap. If you are using a caulk gun, hold it at a consistent angle and apply steady pressure. Aim to fill the gap completely.
Immediately after applying the caulk, use a damp cloth or a caulk smoothing tool to smooth out the bead.
This creates a neat finish and ensures the caulk adheres well. Wipe away any excess caulk from the window frame or glass before it dries.
Allow the caulk to cure according to the manufacturer’s instructions. For best results, avoid exposing the newly sealed area to heavy rain or extreme temperatures for at least 24 hours. This simple repair can significantly improve the seal’s effectiveness.
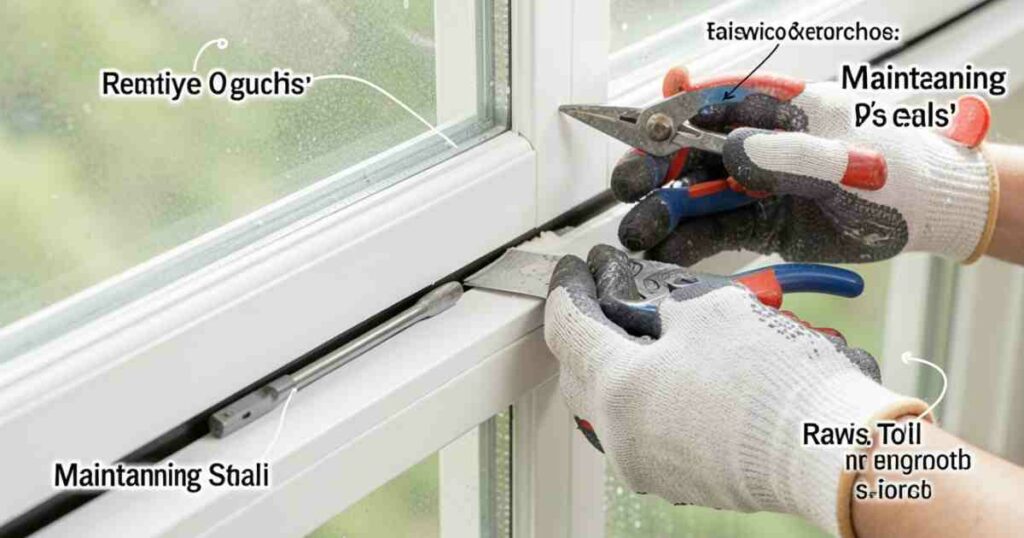
Step 4 Replacing Damaged Weatherstripping
If your window has weatherstripping that is worn out, cracked, or missing, it’s time to replace it.
First, carefully remove the old weatherstripping. You can use a putty knife or pliers to peel it away from the frame.
Clean the channel where the old weatherstripping was located. Remove any old adhesive or debris to ensure the new material sticks properly. Ensure the surface is completely dry.
Once the channel is clean and dry, begin applying the new weatherstripping. Most types of weatherstripping come with an adhesive backing. Peel off the backing as you go, pressing the new material firmly into place.
Make sure to work in one continuous piece if possible, or overlap ends carefully to avoid gaps.
Cut the weatherstripping to size with scissors or a utility knife. Overlap the ends slightly in a corner to create a watertight seal. Press down firmly along the entire length to ensure good adhesion.
This replacement will restore a tight seal and prevent draughts.
Step 5 Replacing Failed Sealant
When the sealant around your window is cracked, peeling, or missing in larger sections, it needs to be replaced.
Start by carefully removing all of the old sealant. A utility knife or a paint scraper can be useful here.
Work slowly to avoid damaging the window frame or glass.
Once all the old sealant is removed, clean the area thoroughly. Use soap and water to remove any residue, and then dry the area completely. A clean, dry surface is essential for the new sealant to adhere properly.
Now, load your caulk gun with the new exterior sealant. Apply a continuous bead of sealant along the entire seam where the window meets the frame. Try to maintain a consistent thickness and pressure for an even application.
Immediately after applying the sealant, smooth it out with a damp cloth, a caulk tool, or your finger (wearing a glove).
This ensures a neat finish and a good seal. Remove any excess sealant from the surrounding surfaces before it dries.
Let the new sealant cure completely as per the product instructions.
Step 6 Testing Your Work
After completing your repairs or replacements, it’s wise to test your work. On a windy day, stand near your windows and feel for any draughts. You should notice a significant difference compared to before.
Another way to test is by using a smoke pencil or an incense stick. Light the incense and gently move it around the edges of your window seals.
If you see the smoke being drawn into the window or blown away from it, it indicates an air leak.
You can also perform a simple water test after it rains or if you have a hose. Spray water around the window frame and check the inside for any signs of leaks or dampness.
If everything is dry and you don’t feel any draughts, your window seals are in good condition.
Benefits of Well-Maintained Window Seals
Taking the time to maintain your window seals offers many advantages. It’s not just about fixing a problem; it’s about improving your living environment and saving money. These benefits are tangible and contribute to a more comfortable and efficient home.
The most immediate benefit is increased comfort. A home with properly sealed windows feels warmer in the winter and cooler in the summer.
This consistency means you are less likely to experience cold spots or feel drafts blowing through your living spaces.
Beyond comfort, well-maintained seals lead to significant energy savings. When your home is properly sealed, your heating and cooling systems don’t have to work as hard. This directly translates into lower utility bills, saving you money month after month.
It’s a cost-effective home improvement that pays for itself over time.
Protecting your home from moisture is another crucial benefit. By preventing water from seeping in, you reduce the risk of rot in window frames and the growth of mold and mildew.
This not only keeps your home looking better but also contributes to a healthier indoor air quality for you and your family.
Energy Savings and Reduced Utility Bills
One of the most significant advantages of properly sealed windows is the reduction in energy consumption.
When heat escapes through gaps and cracks in your window seals, your heating system must work harder and longer to compensate. This increased workload consumes more energy, leading to higher heating bills.
Conversely, during warmer months, hot air can enter your home through faulty seals, forcing your air conditioner to run more frequently. This also leads to increased energy usage and higher cooling costs.
By ensuring your window seals are in good condition, you create a more airtight home. This helps maintain a stable indoor temperature, allowing your HVAC systems to operate more efficiently.
Studies suggest that sealing air leaks can reduce energy bills by up to 20% annually, making it a smart investment for any homeowner.
Improved Indoor Air Quality
Faulty window seals can negatively impact your indoor air quality in several ways. Firstly, they allow unfiltered outside air to enter your home. This can bring in pollutants, allergens like pollen and dust, and even small insects.
Secondly, the moisture that seeps in through damaged seals creates the perfect environment for mold and mildew to grow.
Mold spores can become airborne and are a common trigger for allergies, asthma, and other respiratory problems. Breathing in these spores can lead to health issues for all occupants.
By maintaining your window seals, you create a better barrier against these airborne contaminants. This helps keep your indoor air cleaner and healthier, contributing to a more comfortable and safe living environment.
A good seal prevents unwanted outside elements from compromising your home’s air.
Enhanced Comfort and Home Value
A home with well-maintained window seals provides a more consistent and comfortable living environment.
You’ll notice fewer cold drafts in the winter and less stuffiness in the summer. This stable temperature reduces the need for constant adjustments to your thermostat, leading to greater overall comfort for everyone in the house.
Furthermore, a well-maintained home often has a higher resale value. Potential buyers look for homes that are energy-efficient and well-cared for. Visible signs of neglect, like drafty windows, can be a red flag.
Investing in your window seals is an investment in your home’s appeal and marketability.
The peace of mind that comes with knowing your home is protected from the elements and operating efficiently is invaluable. It contributes to a more enjoyable and worry-free living experience.
When to Call a Professional
While many window seal issues can be handled with simple DIY repairs, there are times when it's best to call in the experts.
If you’ve tried the basic steps and are still experiencing problems, or if the damage seems extensive, professional help is recommended.
For instance, if you have very old windows with significant frame damage, or if your double-paned windows have failed seals and are full of condensation, a professional can offer more advanced solutions.
They have specialized tools and knowledge to assess and fix complex issues that might be beyond the scope of a typical homeowner.
Also, if you are uncomfortable with heights or working with tools, it’s safer to let a professional handle the job.
They can ensure the work is done correctly and efficiently, giving you peace of mind and a properly sealed home.
Signs You Need Expert Help
There are clear indicators that suggest it’s time to seek professional assistance for your window seals.
If you’ve attempted repairs yourself and the problem persists, it’s a strong sign that a deeper issue is at play.
This could be due to underlying structural problems or a need for specialized repair techniques.
For homes with older windows, particularly those with single panes or wooden frames, the seals may be integrated in a way that requires expert knowledge to
Another key sign is when you have double or triple-paned windows where the seal between the panes has failed, leading to fogging or condensation.
Repairing these sealed units often requires specialized equipment and expertise that most homeowners do not possess. Professionals can replace the entire sealed unit or offer specialized repair services.
Professional Seal Replacement Options
When you hire a professional, they typically have access to a wider range of high-performance sealants and materials that might not be available to the general public. These materials are often designed for greater durability and weather resistance.
For double or triple-paned windows, professionals can often replace the entire sealed unit if the existing one has failed.
This involves carefully removing the old insulated glass unit and installing a new one. This method ensures a complete and effective seal, restoring the window’s energy efficiency.
Some professionals also offer more advanced sealing techniques, such as injecting insulating foam into wall cavities around windows or applying specialized exterior coatings that can help improve the overall seal and weatherproofing of your home.
They can also identify and fix issues that you might not be aware of, ensuring a comprehensive solution.
Common Window Seal Mistakes to Avoid
Even with the best intentions, homeowners can make mistakes when trying to fix their window seals.
Being aware of these common pitfalls can help you avoid them and ensure your repairs are effective and long-lasting. It’s about doing it right the first time.
One common mistake is using the wrong type of sealant. Not all caulks are created equal, and using an interior caulk on an exterior window can lead to premature failure.
Always choose a product designed for outdoor use and that can withstand varying weather conditions.
Another mistake is not properly preparing the surface. Applying sealant over dirt, dust, or old, peeling caulk will result in a poor bond.
The surface must be clean, dry, and sound for the new material to adhere properly and create a lasting seal.
Finally, rushing the job is a frequent error. Trying to apply sealant too quickly or not allowing it to cure properly can compromise the integrity of the seal. Patience and attention to detail are crucial for successful window seal maintenance.
Using the Wrong Sealant Material
A frequent error is selecting a sealant that isn’t suited for the job. For instance, using a standard interior caulk on exterior windows is a recipe for disaster.
These caulks often aren’t designed to withstand UV rays, temperature fluctuations, or moisture, leading them to crack, peel, or break down quickly.
Conversely, some highly specialized sealants might be too rigid for windows that expand and contract with temperature changes. This lack of flexibility can cause the sealant to crack over time.
It’s important to choose a sealant that is specifically designed for exterior windows and doors, often labeled as “weatherproof,” “flexible,” or “paintable” if you intend to paint over it.
Another oversight can be not checking if the sealant is compatible with the materials it’s being applied to, such as wood, vinyl, or metal.
Some sealants may react poorly with certain materials, causing damage or poor adhesion. Always read the product label and description carefully.
Inadequate Surface Preparation
Skipping proper surface preparation is a common mistake that significantly reduces the effectiveness and lifespan of any seal. Before applying new caulk or sealant, the area must be completely clean and dry.
Dirt, dust, old caulk residue, and even soap remnants can prevent the new sealant from adhering properly.
This can lead to gaps forming later, rendering the repair useless. Imagine trying to stick a sticker onto a dirty surface – it won’t hold well.
Thoroughly cleaning the area with a suitable cleaner and then rinsing and allowing it to dry completely is a non-negotiable step.
For old, failing sealant, it’s often necessary to scrape it away entirely to ensure a fresh, clean surface for the new material.
Not Allowing Sealant to Cure
Patience is a virtue when it comes to sealant and caulk. Many people rush the process and expose newly applied sealant to the elements before it has fully cured. Sealant needs time to harden and form a durable bond.
If you expose fresh sealant to rain, extreme temperatures, or even direct sunlight too soon, it can disrupt the curing process.
This might result in a soft, gummy texture, cracks, or a weak bond. The seal won’t be as effective or long-lasting as it should be.
Always check the product packaging for the recommended curing time. This can range from a few hours to several days, depending on the type of sealant and environmental conditions.
Avoiding stress on the newly sealed area during this critical period is key to a successful repair.
Frequently Asked Questions Of How to Maintain Window Seals for Fewer Draughts and Damp
Question: How often should I check my window seals?
Answer: It is a good idea to check your window seals at least once a year, ideally in the spring or fall, to catch any issues before they worsen or cause problems during the extreme weather seasons.
Question: Can I seal windows from the inside?
Answer: While you can do some minor touch-ups from the inside, the most effective sealing is done from the outside to create a barrier against external elements like rain and wind.
Question: What is the difference between caulk and sealant?
Answer: While often used interchangeably, sealant is generally more flexible and durable than caulk, making it better suited for areas that experience movement or significant weather exposure, like exterior window seals.
Question: How can I tell if my double-paned window seal has failed?
Answer: The most common sign is condensation or fogging that appears between the two panes of glass. This indicates that the seal has broken, and moist air has entered the gap.
Question: Is it worth repairing old window seals?
Answer: Yes, repairing or replacing old window seals is very much worth it. It significantly improves energy efficiency, reduces utility bills, enhances comfort, and helps prevent moisture damage and mold growth in your home.
Summary
Properly maintaining your window seals is a straightforward yet impactful way to enhance your home’s comfort and efficiency.
By regularly inspecting, cleaning, and repairing or replacing worn seals, you effectively prevent draughts and moisture ingress.
This leads to lower energy bills, improved indoor air quality, and a more pleasant living environment, ensuring your home remains cozy and dry.
![What Is an Espresso Machine Explained Simply[1]](https://creativehouseblog.com/wp-content/uploads/2026/03/What_Is_an_Espresso_Machine_Explained_Simply1-768x448.jpg)
![How to Descale an Electric Kettle Easily[1]](https://creativehouseblog.com/wp-content/uploads/2026/03/How_to_Descale_an_Electric_Kettle_Easily1-768x448.jpg)
![How to Clean Air Filters So Your HVAC Runs Properly[1]](https://creativehouseblog.com/wp-content/uploads/2026/05/How_to_Clean_Air_Filters_So_Your_HVAC_Runs_Properly1-768x403.jpg)
![Smart Ways How to Keep Your Home Cool Without Wasting Energy[1]](https://creativehouseblog.com/wp-content/uploads/2026/05/Smart_Ways_How_to_Keep_Your_Home_Cool_Without_Wasting_Energy1-768x403.jpg)
![Air Fryer Fan Technology Explained[1]](https://creativehouseblog.com/wp-content/uploads/2026/03/Air_Fryer_Fan_Technology_Explained1-768x448.jpg)
![10 Sweet & Savoury Crepe Variations[1]](https://creativehouseblog.com/wp-content/uploads/2026/04/10_Sweet__Savoury_Crepe_Variations1-768x448.jpg)