Sometimes, a window pane can get damaged, and you might wonder if you need a pro to fix it.
Fixing a broken or loose window pane yourself can seem a bit tricky, especially if you’ve never done it before. It might feel like a big job.
But guess what? It’s actually quite manageable with the right steps. We’ll show you exactly how to reglaze a window pane without professional help.
You’ll learn everything you need to get your window looking great again.
Key Takeaways
- You can save money by reglazing your own window pane.
- Gathering the right tools and materials makes the job easier.
- Removing old putty carefully is an important first step.
- Properly applying new glazing putty ensures a good seal.
- Allowing the putty to cure is essential for durability.
- You can achieve professional-looking results at home.
![How to Reglaze a Window Pane Without Professional Help[1]](https://creativehouseblog.com/wp-content/uploads/2026/05/How_to_Reglaze_a_Window_Pane_Without_Professional_Help1.jpg)
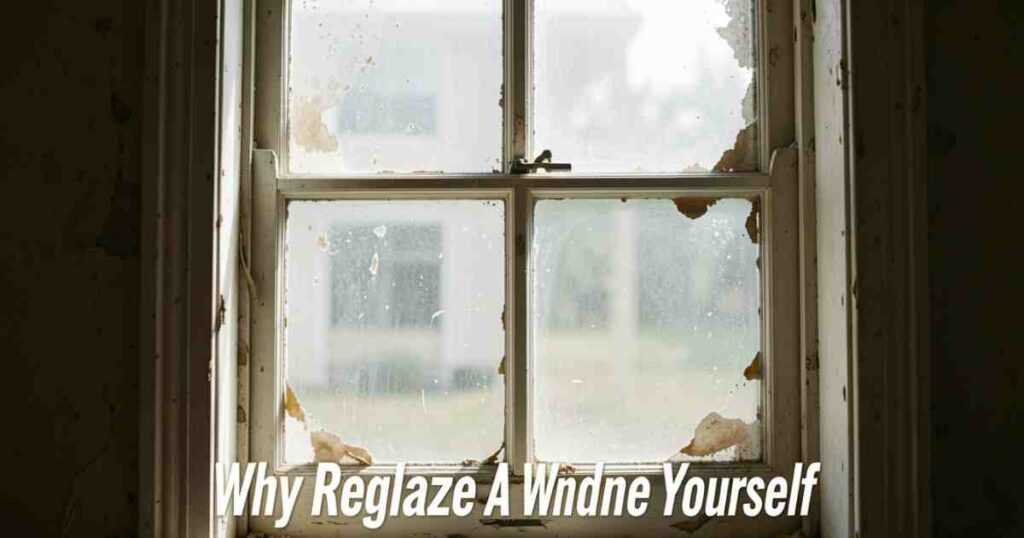
Why Reglaze A Window Pane Yourself
Reglazing a window pane yourself offers several great advantages. The most obvious is saving money. Hiring a professional can be costly, especially for small repairs.
Doing it yourself means you only pay for the materials, which are usually quite affordable. This DIY approach also gives you a sense of accomplishment. You learn a new skill and gain confidence in your ability to handle home repairs.
It’s a rewarding process that leaves you with a functional and good-looking window.
Cost Savings Explained
The cost difference between DIY reglazing and hiring a professional is significant. Professional window repair services often charge an hourly rate plus material costs. This can add up quickly, especially if the job takes longer than expected.
For a single window pane, a professional might charge anywhere from $100 to $300 or more, depending on your location and the complexity of the repair.
When you reglaze it yourself, your expenses are limited to the cost of glazing putty, a putty knife, a heat gun, and perhaps a new piece of glass if needed. These supplies can typically be purchased for under $30.
This makes DIY a very attractive option for budget-conscious homeowners.
Consider a situation where a small pane of glass in an older wooden sash window has cracked.
A homeowner might get a quote from a local glazier for $150. By purchasing a small tub of glazing putty for $10, a stiff putty knife for $5, and a heat gun for $20 (if they don’t already own one), the total cost is only $35.
The savings are clear, allowing the homeowner to spend the difference on other home improvement projects or simply keep it in their pocket.
Learning A New Skill
Taking on a DIY project like reglazing a window pane is a fantastic way to learn practical skills.
Many homeowners feel intimidated by home repairs, but breaking down the process makes it accessible.
You’ll learn how to safely remove old materials, prepare surfaces, and apply new materials with precision.
This knowledge can then be applied to other home maintenance tasks. It builds confidence and self-reliance, empowering you to tackle future projects without hesitation. The satisfaction of a job well done is often worth more than the money saved.
Imagine a person who has always relied on others for home repairs. They decide to reglaze a window. They watch a few videos, gather their tools, and get to work.
Even if it’s not perfect the first time, they learn a lot. They discover they can handle challenges and solve problems.
This success can lead them to try other DIY projects, gradually building a strong skillset for home maintenance.
Environmental Benefits
Choosing to reglaze rather than replace an entire window also has positive environmental impacts.
When you reglaze, you’re salvaging the existing window frame, which often has character and history. This reduces waste that would otherwise go to landfills.
Manufacturing new windows requires significant energy and resources. By repairing what you have, you contribute to sustainability and reduce your home’s carbon footprint. It’s a small action that makes a difference in preserving resources.
Gathering Your Tools And Materials For How To Reglaze A Window Pane Without Professional Help
Before you start, having all the right tools and materials is key to a smooth and successful reglazing job.
This preparation ensures you don’t have to stop midway to go shopping. Think of it as getting your recipe ingredients ready before you begin cooking.
Having everything within reach makes the process efficient and less stressful. You’ll be able to focus on the task at hand without any interruptions.
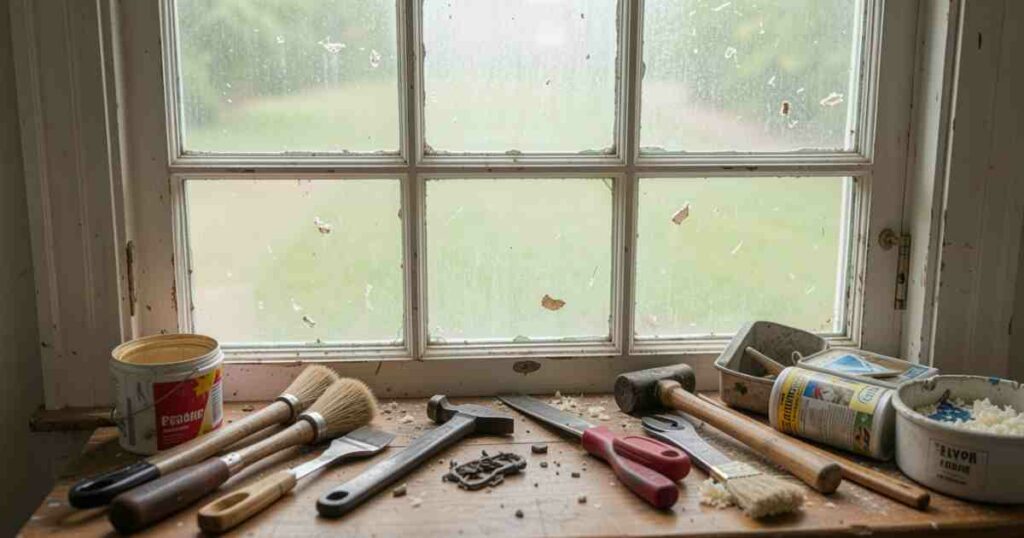
Essential Tools
You’ll need a few key tools to get the job done right. A stiff putty knife is essential for scraping away old putty. You might also need a chisel or a utility knife for more stubborn bits.
A heat gun can be very helpful to soften old putty, making it easier to remove. Safety glasses are a must to protect your eyes from flying debris. Gloves are also recommended to keep your hands clean and protected.
Lastly, a small brush for cleaning the frame is useful.
Here’s a list of the primary tools you’ll want:
- Stiff putty knife
- Chisel (optional, for stubborn putty)
- Heat gun
- Safety glasses
- Work gloves
- Small brush or whisk broom
- Rags
Necessary Materials
The main material you’ll need is glazing putty. This is a special type of putty designed to seal the gap between the glass and the window frame.
Make sure to buy glazing putty specifically, not regular wood putty, as it needs to be flexible and weather-resistant.
You’ll also need new glass if the pane is broken, and you might want a primer or sealer for the wood frame.
A small amount of linseed oil can help keep the putty pliable if it starts to dry out too quickly.
Here are the materials you should have on hand:
- Glazing putty (enough for your window pane size)
- New glass pane (if needed, cut to size)
- Primer or sealer for wood (optional)
- Linseed oil (optional, for putty)
- Paint or stain (to match your window frame, if desired)
Preparing The Window Frame
Before applying new putty, the window frame needs to be clean and ready. This involves removing all traces of old putty and paint. Scrape away any loose paint.
If there are any rough spots, you can lightly sand them. Make sure the frame is dry. A clean surface helps the new putty adhere properly and creates a good seal.
If your window frame is bare wood, you might want to apply a coat of primer or sealer. This protects the wood and helps the putty last longer.
This preparation step is crucial. Imagine trying to glue something to a dirty, oily surface – it won’t stick well. The same applies to glazing putty.
A clean, smooth frame ensures a strong bond. This means your new reglazed window will be more durable and less likely to leak air or water.
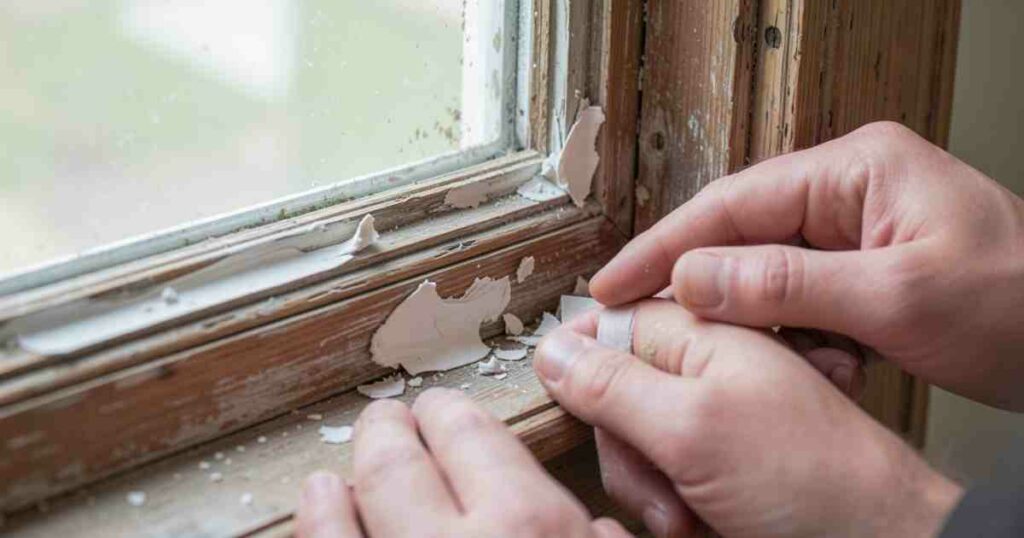
Removing The Old Glazing Putty
Removing the old, hardened glazing putty is the first major step in the process of how to reglaze a window pane without professional help.
This part can be a bit tedious, but taking your time here makes the rest of the job much easier. You need to be thorough to ensure the new putty has a good surface to adhere to.
Think of it as clearing the table before setting it for a new meal.
Safety First
Always prioritize safety when removing old putty. Old putty can contain lead paint, especially in older homes. Wear your safety glasses and gloves.
If you suspect lead paint, consider using a dust mask. Work in a well-ventilated area. If you’re using a heat gun, be cautious not to overheat the glass, as it could crack.
Also, be careful not to cut yourself on any sharp glass edges. Taking these precautions ensures a safe working environment.
Scraping And Softening
Start by using your stiff putty knife to carefully scrape away as much of the old putty as possible.
Work gently to avoid damaging the wood frame or the glass. For putty that is very hard and brittle, a heat gun can be a lifesaver.
Apply heat to a small section at a time, allowing the putty to soften. Once softened, it should scrape away more easily. Continue this process around the entire pane.
If there are still small pieces of putty or paint clinging to the frame, you can use a chisel or a utility knife for more precise removal.
Be careful not to gouge the wood. After scraping, use a small brush to clean out any remaining dust and debris from the groove, also known as the rabbet, where the glass sits.
A clean rabbet is essential for a good seal.
Dealing With Stubborn Putty
Sometimes, putty can be extremely stubborn. If the heat gun isn’t working well, or if the putty is deeply embedded, you might need to be a bit more persistent. A sharp chisel used at a shallow angle can help lift it.
Some people find that carefully tapping the putty with a hammer and chisel can break it apart.
For very old, paint-sealed putty, you might need to score it with a utility knife before trying to scrape. Remember, patience is key.
Rushing this step can lead to damage that’s harder to fix later.
The goal is to get down to the bare wood of the frame where the putty was. This might involve multiple passes with your tools. Don’t worry if the frame isn’t perfectly smooth; the new putty will fill minor imperfections.
However, any large chunks of old material should be removed.
Removing The Old Glass Pane
Once the old putty is removed, you can take out the glass pane. If the pane is already broken, carefully remove the pieces, starting from the largest ones and working your way down. Use gloves and safety glasses.
If the pane is intact but loose, it should lift out easily after the putty is gone. If it’s stuck, gently tap around the edges with the handle of your putty knife or a rubber mallet to loosen it. Be very careful not to break intact glass unless you intend to replace it.
If the pane is intact and you plan to reuse it, handle it with care. Place it somewhere safe and clean while you prepare to install the new putty and glass.
If you are installing new glass, measure the opening accurately before you take the old pane out or as soon as it’s removed.
Installing The New Glass And Glazing Putty
This is where your window starts to look whole again. Properly installing the new glass and applying the glazing putty is crucial for a good seal and a lasting repair.
It’s a step that requires a bit of finesse, but following the process will lead to excellent results.
You’re essentially creating a protective barrier that also looks good.
Fitting The New Glass
If you’re replacing the glass, ensure your new pane is cut to the correct size. It should fit snugly into the window frame’s opening, but not be so tight that it stresses the glass.
A common practice is to cut the glass slightly smaller than the opening to allow for expansion and contraction with temperature changes.
Usually, about 1/8 inch gap on all sides is sufficient. If you’re reusing the old glass, make sure it’s clean and free of chips or cracks.
Carefully place the glass pane into the prepared frame. It should sit evenly in the rabbet. If the glass doesn’t sit flush, you may need to gently tap it into place with a rubber mallet or the handle of your putty knife.
Ensure it’s centered and doesn’t have any gaps around the edges where air could get in.
Applying A Bedding Of Putty
Before setting the glass, it’s a good idea to apply a thin “bed” of glazing putty around the inside edge of the rabbet.
This soft layer acts as a cushion for the glass and helps create a better seal. Roll a small amount of putty into a rope-like shape and press it into the groove where the glass will sit.
This step isn’t always necessary but can improve the longevity of the seal.
When you’re ready to place the glass, press it gently but firmly into this putty bed. This creates a seal on the interior side of the window.
The excess putty will squeeze out slightly, and you can then trim it away with your putty knife.
This initial bedding layer is often unseen but plays an important role in preventing drafts and moisture.
Applying The Exterior Glazing Putty
Now comes the main application of the glazing putty. Take a generous amount of putty and roll it into a rope, similar to the bedding putty.
Press this rope firmly into the angle between the glass and the window frame on the outside.
Use your putty knife, holding it at about a 45-degree angle to the glass, to smooth the putty into a neat, beveled edge. The putty should form a continuous seal from the frame to the glass.
Work your way around the entire pane. The goal is to create a smooth, even surface that sheds water away from the glass and frame.
Avoid getting putty on the glass itself, though some overlap is acceptable as it can be cleaned off once dry.
Consistent pressure and angle are important for a uniform finish. This application is what most people picture when they think of reglazing a window.
Technique For A Smooth Finish
Achieving a smooth, professional-looking finish requires practice. Hold your putty knife at a consistent angle. Start from one corner and pull the knife smoothly along the joint, applying even pressure.
Overlap your strokes slightly to ensure there are no gaps. If the putty starts to drag or becomes difficult to work with, it may be getting too dry. You can dip your putty knife in linseed oil occasionally to help it glide better.
You want to create a clean line where the putty meets the glass and the frame. Any excess putty that squeezes out should be carefully scraped away immediately.
Some minor imperfections are normal for a DIY job, but aiming for a smooth, consistent bevel will give your window a polished look.
This putty will eventually be painted over, hiding any minor flaws.
Finishing Touches And Curing
Once the putty is applied and smoothed, you can clean up any excess that got onto the glass.
A razor blade or a fine-grit sandpaper can be used for this once the putty has firmed up slightly. Allow the glazing putty to cure properly before painting.
The curing time can vary depending on the product and humidity, but it typically takes several days to a couple of weeks.
The putty should feel firm to the touch and not be easily indented. Painting too soon can cause the putty to crack or peel later.
After the putty has cured, you can paint it to match your window frame. Use an exterior-grade paint.
The paint not only enhances the appearance but also provides an extra layer of protection for the putty, helping it to last longer and seal more effectively against the elements.
Common Problems And Solutions When You Reglaze A Window Pane
Even with careful preparation, you might run into a few snags when you reglaze a window pane. Knowing common issues and how to fix them will make the process less frustrating.
These are small challenges that are part of learning how to reglaze a window pane without professional help.
Having solutions ready means you can overcome them quickly.
Putty Not Sticking
If your putty isn’t sticking well, it’s usually because the surface isn’t clean or dry. Make sure you’ve scraped off all old putty and paint.
If the wood is very porous or has been exposed to moisture, it might be absorbing the oil from the putty too quickly.
Applying a thin coat of primer or a wood sealer to the frame first and letting it dry completely can help. This creates a more stable surface for the putty.
Another reason could be that the putty is too old and has dried out in the container. Always check the expiration date if available and ensure the putty is still pliable. If it feels stiff, try kneading it with a little linseed oil to revive it before applying.
Cracked Or Sagging Putty
If the putty cracks or sags after application, it’s often due to improper application or not allowing it to cure properly.
Make sure you are applying enough putty to create a solid bead. If the putty is too thin, it can crack.
Also, painting the putty too soon is a common cause of sagging or peeling. It needs time to harden and bond with the frame and glass. Rushing this step will lead to problems down the line.
Ensure the putty is fully cured before painting. You can test this by pressing gently on it. If it feels soft or leaves an indentation, it needs more time.
If it’s a large crack, you might need to remove the affected section and reapply putty. For minor cracks, they might be filled in with paint, but it’s best to address them properly.
Air Leaks And Drafts
Air leaks are a sign that the seal between the glass and the frame isn’t complete. This can happen if there are gaps where the putty didn’t adhere properly or if it cracked over time.
After the putty has cured and you’ve painted it, you can test for drafts by holding a lit incense stick or a thin piece of tissue paper near the window edges on a windy day.
If the smoke or tissue moves, there’s a leak.
Small leaks can sometimes be sealed with a bead of exterior-grade caulk. For more significant leaks, you might need to remove the putty from that section and reapply it.
Ensuring the putty is pressed firmly into the rabbet and smoothed evenly is the best way to prevent these issues from the start.
The beveled edge of the putty is designed to direct water away, but it also creates a tight seal against air.
Painting Issues
Paint can sometimes peel or chip off the glazing putty if it wasn’t applied to a fully cured surface. Another common issue is paint sticking to the glass.
This can be avoided by carefully scraping away any excess putty from the glass before it dries and by using painter’s tape to mask off the glass if you’re worried about getting paint on it.
However, a properly applied and smoothed putty line usually means you don’t need tape.
When painting, use an exterior-grade paint suitable for wood and putty. Apply two thin coats for better coverage and durability.
Ensure the paint overlaps slightly onto both the glass and the frame, creating a complete seal.
This helps protect the putty from moisture and extends its lifespan.
Real-Life Examples And Scenarios
Let’s look at a couple of situations where reglazing a window pane made a real difference. These examples show how practical this skill can be for homeowners.
Example 1 A Drafty Conservatory Window
Mrs. Henderson had an old conservatory with several large panes of glass. Over the years, the glazing putty on many of them had become brittle and cracked, leading to significant drafts and heat loss.
She got quotes from several companies that ranged from $800 to $1500 to
Example 2 A Cracked Garage Window
Mr. Patel’s garage had a small, clear glass window that was cracked after a stray baseball hit it. The crack wasn’t severe enough to warrant a full window replacement, but it let in water and dirt.
A handyman quoted him $100 to replace just the glass and re-seal it. Mr. Patel decided to try it himself.
He ordered a replacement glass pane online for $20, cut precisely to size. He already had a putty knife and gloves.
He followed an online guide, removed the broken glass carefully, cleaned the frame, and installed the new glass.
He then applied new glazing putty. The entire process took him about two hours. He spent only $20 for the glass and $10 for a small amount of putty, saving $70 and learning a valuable skill for future repairs.
Scenario A A Quick Fix For A Loose Pane
Imagine you notice a pane of glass in an old cabinet door is slightly loose and rattling. The putty around it looks dried out. Instead of waiting for it to fall out, you can quickly address this.
You’d gather a putty knife and a small amount of glazing putty. You would gently work the putty knife under the edge of the glass to see if it will lift slightly.
If it does, you might be able to apply a little more putty around the loose edge to secure it.
This is a very basic application of reglazing principles.
Scenario B A Complete Pane Replacement
Consider a situation where a storm has caused a window pane to break completely. You need to remove all the glass shards, scrape out all the old putty, clean the frame thoroughly, and then install a new piece of glass.
After bedding the glass, you’ll apply the exterior putty, smooth it, and allow it to cure before painting.
This is the full process, and it’s what most guides, including this one, cover in detail.
Frequently Asked Questions Of How to Reglaze a Window Pane Without Professional Help
Question: How long does glazing putty typically take to dry?
Answer: Glazing putty usually takes several days to a couple of weeks to cure properly. The exact time depends on the product, humidity, and temperature. It should feel firm and not indent easily before painting.
Question: Can I use regular caulk instead of glazing putty?
Answer: No, regular caulk is not a good substitute for glazing putty. Glazing putty is specifically formulated to be stiff and durable for sealing glass into frames, while caulk is flexible and might sag or not provide enough support.
Question: Do I need to prime the wood frame before applying putty?
Answer: Priming the wood frame is recommended, especially if the wood is bare or porous. It helps prevent the wood from absorbing oil from the putty too quickly, which can lead to the putty drying out and cracking prematurely.
Question: How do I clean paint off the glass after reglazing?
Answer: Once the putty has hardened slightly but is not fully cured, you can use a razor blade held at a low angle to gently scrape paint off the glass. Be very careful not to scratch the glass. Ensure the putty is firm enough not to be pulled away.
Question: What if I break the glass while removing it?
Answer: If you break the glass during removal, don’t worry. Safety first: wear gloves and safety glasses and carefully remove all glass shards. You will then proceed with the reglazing process as if you were installing a new pane of glass, which you will need to measure for and obtain.
Summary
You’ve learned how to reglaze a window pane step-by-step, from gathering your tools to the final paint job.
This process is achievable for anyone willing to put in a little effort. You can save money and gain a valuable home repair skill.
Get your materials, work carefully, and enjoy your newly sealed window.
![How Often Should You Clean Your Gutters and Why[1]](https://creativehouseblog.com/wp-content/uploads/2026/05/How_Often_Should_You_Clean_Your_Gutters_and_Why1-768x403.jpg)
![10 Surprising Uses Of An Egg Cooker[1]](https://creativehouseblog.com/wp-content/uploads/2026/04/10_Surprising_Uses_Of_An_Egg_Cooker1-768x448.jpg)
![How to Use a Pressure Cooker Safely[1]](https://creativehouseblog.com/wp-content/uploads/2026/03/How_to_Use_a_Pressure_Cooker_Safely1-768x448.jpg)

![How to Build a Home Maintenance Routine You’ll Love[1]](https://creativehouseblog.com/wp-content/uploads/2026/05/How_to_Build_a_Home_Maintenance_Routine_Youll_Love1-768x403.jpg)
![9 Breakfast Ideas Using A Waffle Maker[1]](https://creativehouseblog.com/wp-content/uploads/2026/04/9_Breakfast_Ideas_Using_A_Waffle_Maker1-768x448.jpg)