Winter can be beautiful, but it also brings challenges for homeowners, especially when it comes to keeping our homes safe and sound.
One common problem many people face is ice dams forming on their roofs. It might seem a bit tricky to figure out, but don’t worry!
We’ve got a simple plan to help you tackle this. Get ready to learn exactly How to Prevent Ice Dams on Your Roof in Winter Months with easy-to-follow steps.
Key Takeaways
- Proper attic insulation is key to preventing heat loss into the attic space.
- Good attic ventilation helps keep the roof deck cold, stopping snow melt.
- Sealing air leaks from the living space into the attic is vital.
- Understanding how heat moves helps you stop ice dams before they start.
- Regular roof and gutter maintenance can prevent many ice dam issues.
![How to Prevent Ice Dams on Your Roof in Winter[1]](https://creativehouseblog.com/wp-content/uploads/2026/05/How_to_Prevent_Ice_Dams_on_Your_Roof_in_Winter1.jpg)
Understanding Ice Dams and Roof Problems
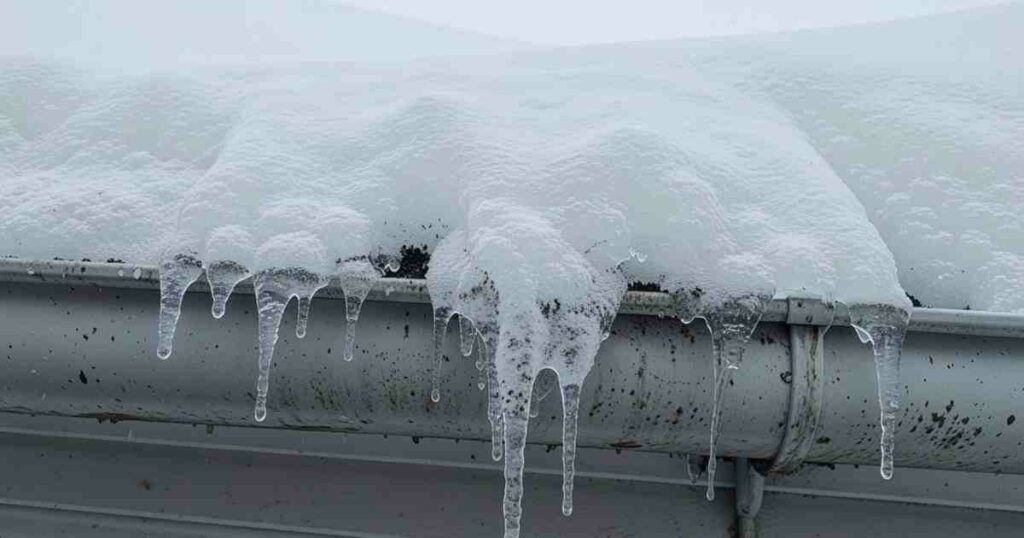
An ice dam is a ridge of ice that forms at the edge of a roof. It prevents melting snow from draining off the roof.
When snow melts, water can back up behind the ice dam. This trapped water can then seep under shingles and into your home. This can cause serious damage to insulation, ceilings, and walls.
This problem often happens in colder climates. It’s usually caused by a combination of poor attic insulation and inadequate ventilation. Warm air escaping from your home into the attic heats the roof.
This heat melts the snow on the upper part of the roof. The melted water then flows down to the colder eaves. There, it refreezes, creating the ice dam. This cycle repeats, making the dam grow larger.
Learning how to prevent ice dams on your roof in winter months is important for home maintenance. Many homeowners find this issue frustrating. They might not know where to start.
The good news is that with the right knowledge, you can fix and prevent these issues. We will break down the main causes and solutions. This will help you protect your home from winter damage.
What Causes Ice Dams
Ice dams form when the roof surface temperature is not uniform. The part of the roof over heated living spaces becomes warmer than the eaves. This temperature difference is the main culprit.
Uneven Roof Temperatures
When the upper parts of your roof are warmer than the edges, snow melts. This happens because heat escapes from your home’s living areas. This warm air rises into your attic. It then warms the underside of your roof sheathing.
Poor Attic Insulation
If your attic insulation is thin or has gaps, warm air from your house can easily reach the attic.
This makes the roof warm enough to melt snow. Good insulation acts as a barrier, keeping heat inside your living space.
Air Leaks into the Attic
Gaps and cracks in your ceiling, around light fixtures, plumbing vents, and attic hatches allow warm air to escape.
These are often called air leaks. They are like chimneys for heat, directing it straight into the attic. Sealing these leaks is a critical step in preventing ice dams.
Inadequate Attic Ventilation
A properly ventilated attic allows cold outside air to circulate. This keeps the roof deck cold.
It helps prevent snow from melting in the first place. Without enough ventilation, heat can build up in the attic, leading to melting.
Roof Design and Shading
Certain roof designs can be more prone to ice dams. For example, roofs with many dormers or valleys can trap snow and ice. Also, areas of the roof that get less sun might stay colder, leading to freezing.
The Impact of Ice Dams on Your Home
The damage caused by ice dams can be extensive. It’s more than just an unsightly buildup of ice.
Water Damage to Ceilings and Walls
When water backs up behind an ice dam, it can find its way under shingles. It can then seep through the roof deck and into your attic insulation. From there, it can drip onto your ceilings and walls. This leads to stains, peeling paint, and even mold growth.
Damage to Gutters and Downspouts
The weight of ice can cause gutters to pull away from the house. Ice can also block downspouts. This prevents any water that does get through from draining away properly. Frozen gutters can also break or crack.
Mold and Mildew Growth
Moisture trapped in your attic and walls creates an ideal environment for mold and mildew. These can spread quickly and negatively impact indoor air quality. They can also cause health problems for your family.
Structural Damage
In severe cases, the constant presence of water can weaken the roof structure. It can also damage the wooden framing of your house. This can lead to more significant and costly repairs down the line.
How to Prevent Ice Dams on Your Roof in Winter Months
Preventing ice dams involves managing heat flow and ensuring proper airflow. The goal is to keep your entire roof surface cold.
This stops snow from melting unevenly. It’s about making sure your roof stays as cold as the outside air.
Improving Attic Insulation
Proper attic insulation is your first line of defense. It keeps heat from your living space from escaping into the attic. This is a major factor in preventing ice dams.
Understanding R-Value
R-value measures the resistance to heat flow. A higher R-value means better insulation. For attics in cold climates, R-values of R-49 to R-60 are often recommended. You can add more insulation on top of existing insulation.
Types of Insulation
Common types include fiberglass batts, blown-in fiberglass, and cellulose. Blown-in insulation can be very effective. It fills small spaces and covers joists, reducing heat transfer.
DIY Insulation Checks
You can check your attic for adequate insulation levels. Look for areas where the joists are clearly visible. This indicates thin or missing insulation. You can also check for settled insulation.
Professional Installation
For best results, consider professional insulation services. They can assess your current insulation and recommend the best upgrades. They can also ensure the insulation is installed correctly to avoid gaps.
A recent study by Energy Star found that adequate attic insulation can reduce heating costs by up to 30 percent. This is because it directly prevents heat loss. This heat loss is a primary cause of ice dams.
Ensuring Proper Attic Ventilation
Ventilation is just as important as insulation. It allows cold outside air to circulate through the attic. This keeps the roof deck temperature consistent and cold.
How Ventilation Works
A balanced ventilation system uses soffit vents (at the eaves) and ridge vents (at the peak of the roof). Soffit vents allow fresh, cold air to enter the attic. Ridge vents allow warm, moist air to escape.
Importance of Soffit and Ridge Vents
Soffit vents are crucial for bringing in cool air. Ridge vents are excellent for letting warm air out. Together, they create a continuous airflow that cools the entire attic space.
Checking for Blocked Vents
Inspect your soffit and ridge vents regularly. Leaves, debris, or even nesting animals can block them. Ensure they are clear for maximum airflow.
Measuring Airflow
A general rule of thumb is to have at least one square foot of net-free vent area for every 300 square feet of attic floor space. This ratio ensures sufficient air exchange.
According to the Department of Energy, proper attic ventilation can extend the life of your roof by several years. It helps prevent moisture buildup, which can lead to wood rot. This is directly linked to preventing ice dams.
Sealing Air Leaks into the Attic
Warm air from your living space should never reach your attic. Sealing these leaks is a critical step. It stops that heat from melting snow on your roof.
Common Air Leak Locations
Look for leaks around light fixtures, plumbing stacks, attic hatches, chimneys, and where walls meet the ceiling. These are the most common places for warm air to escape.
Using Sealants and Foams
Caulk and spray foam insulation are effective for sealing small gaps and cracks. For larger openings, rigid foam boards can be cut and fitted.
Attic Hatch Sealing
Your attic hatch is a big source of heat loss. Use weatherstripping around the frame and add rigid foam insulation to the back of the hatch cover.
Recessed Lighting Considerations
If you have recessed lights in the ceiling below the attic, ensure they are IC-rated (Insulation Contact rated). Non-IC-rated fixtures can overheat and pose a fire risk if covered with insulation or debris.
A study by the U.S. Environmental Protection Agency (EPA) suggests that air sealing can reduce air leakage by up to 30 percent.
This significantly impacts how much heat escapes into the attic, directly helping to prevent ice dams.
Advanced Strategies for Preventing Ice Dams
Beyond insulation, ventilation, and sealing, there are other methods to combat ice dams. These can offer extra protection, especially in challenging climates.

Ice and Water Shield Installation
This is a specialized underlayment product. It’s installed under your shingles. It provides an extra layer of protection against water penetration.
Where to Install
Ice and water shield is typically installed along the eaves. It should extend at least 24 inches inside the heated wall line. It can also be used in valleys and around chimneys.
How it Works
The material is self-adhering and waterproof. If water backs up behind an ice dam, it will hit this shield instead of the roof deck. This prevents leaks into your attic and home.
Professional Application is Recommended
While some DIYers might attempt this, professional installation ensures proper overlap and sealing. This is key to its effectiveness.
According to roofing industry experts, installing ice and water shield significantly reduces the risk of leaks from ice dams. It’s a proactive measure that can save homeowners from costly water damage repairs.
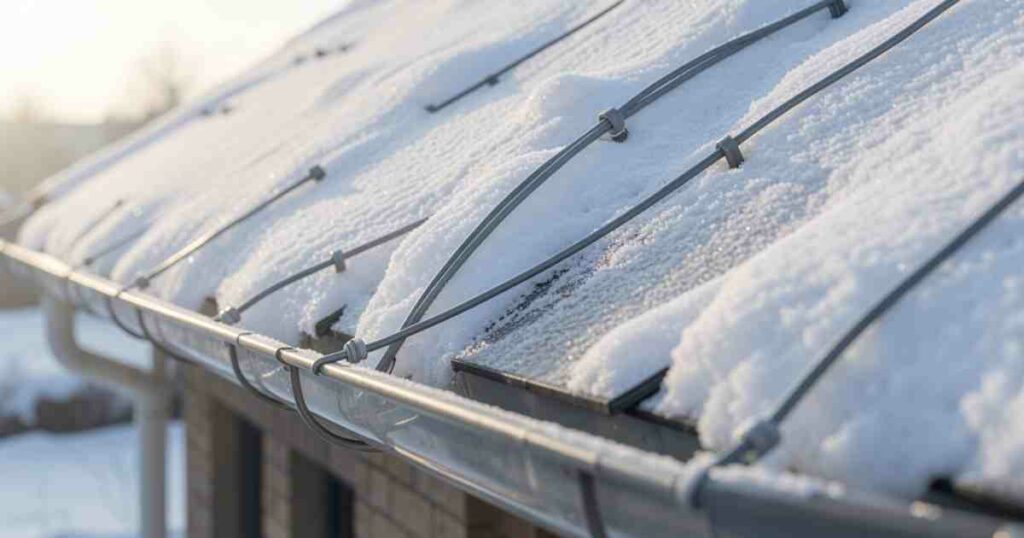
Heated Cables or Heat Tape
Heated cables can be installed along the eaves and in gutters. They melt channels through ice and snow. This allows meltwater to drain away.
Purpose of Heat Tape
Heat tape is designed to create a path for water to flow. It prevents water from pooling and refreezing into a dam.
Installation Considerations
Cables should be installed in a zig-zag pattern along the roof edge. They should also run down into the gutters and downspouts. Proper installation ensures the most effective melting.
Energy Consumption
These systems use electricity, so they can increase your energy bill. They are best used in areas with persistent ice dam problems and where other methods are not fully effective.
A report from a leading home improvement association noted that while heat tape can be effective, it is a band-aid solution. It does not address the root causes of ice dams like poor insulation or ventilation.
Gutter Maintenance and Cleaning
Clean gutters are essential for proper water drainage. Clogged gutters can contribute to ice dams by holding water and ice.
Regular Cleaning Schedule
Gutters should be cleaned at least twice a year. More often if you have many trees nearby that shed leaves and debris.
Checking Downspouts
Ensure downspouts are clear and draining properly. If they are blocked, water will back up into the gutters.
Gutter Guards
Consider installing gutter guards. These can help prevent debris from accumulating in your gutters. They reduce the need for frequent manual cleaning.
A study on home maintenance showed that neglecting gutter cleaning can lead to $1,000 or more in potential water damage repairs annually. This includes damage caused by ice dams forming due to blocked drainage.
DIY vs. Professional Solutions
Deciding whether to tackle ice dam prevention yourself or hire a professional depends on your comfort level and the scope of the problem.
DIY Tasks You Can Do
Some tasks are relatively simple and can be done by a homeowner.
Sealing Air Leaks
This is a very achievable DIY project. You can buy caulk and expanding foam at any hardware store.
Adding Attic Insulation
Adding more batts or blown-in insulation can be a weekend project for many. Safety precautions like wearing a mask and gloves are important.
Cleaning Gutters
This is a common DIY task, but always use a sturdy ladder and ensure safety.
These tasks are great for improving your home's efficiency and preventing minor ice dam issues. They can also save you money on labor costs.
When to Call a Professional
Some issues require expert knowledge and equipment.
Major Insulation Upgrades
If your attic needs significant insulation work or a complete overhaul, professionals are best. They have specialized equipment for blowing insulation.
Ventilation System Installation
Installing new soffit or ridge vents often requires working on the roof. This is a job best left to experienced roofers or contractors.
Roof Inspections and Repairs
If you suspect roof damage or need ice and water shield installed, a professional roofer is necessary. They have the skills to work safely on steep roofs and ensure proper installation.
According to a survey of home renovation projects, DIY projects that go wrong can end up costing more to fix than hiring a professional from the start. It’s important to assess your skills realistically.
Recognizing and Addressing Existing Ice Dams
Sometimes, despite your best efforts, an ice dam might form. Knowing how to deal with it safely is important.
Safe Ways to Remove Ice Dams
Never try to chip away at a large ice dam with a hammer or pickaxe. This can damage your shingles and roof.
Roof Rake Use
A roof rake is a long-handled tool designed to pull snow and ice off the roof edge. Use it gently from the ground. Aim to remove the snow that’s contributing to the dam.
Salt Socks or Calcium Chloride
You can create a sock filled with calcium chloride. Gently toss it onto the ice dam. This will slowly melt a channel through the ice. Ensure it’s safe for your landscaping.
Hot Water (Use with Caution)
Pouring hot water from a hose can melt a channel. Do this cautiously and avoid using boiling water, which can damage shingles.
It is crucial to prioritize safety when dealing with ice dams. Falling ice or working on slippery roofs can cause serious injury.
When to Seek Professional Help for an Existing Dam
If an ice dam is large, causing visible leaks, or you are uncomfortable dealing with it, call a professional.
Visible Leaks Inside Your Home
If you see water dripping into your attic or living space, this is an emergency. Contact a roofing contractor immediately.
Large or Stubborn Ice Dams
Very large ice dams may require specialized equipment and techniques to remove safely.
A home insurance report indicated that water damage from ice dams is one of the most common homeowner claims in colder regions. Prompt professional intervention can minimize these costs.
Frequently Asked Questions Of How to Prevent Ice Dams on Your Roof in Winter
Question: How can I tell if I have an ice dam?
Answer: Look for a thick ridge of ice along the edge of your roof. You might also see icicles hanging from the eaves. If you notice water backing up onto your roof or leaking into your home, that’s a sign of an ice dam.
Question: Is it safe to walk on a roof with snow or ice?
Answer: No, it is never safe to walk on a snow-covered or icy roof. The surfaces are extremely slippery, and you risk a serious fall. It’s best to use tools from the ground or hire a professional.
Question: How often should I check my attic for issues?
Answer: It’s a good idea to check your attic at least once a year, preferably in the fall before winter sets in. Look for any signs of leaks, poor insulation, or blocked vents.
Question: Can ice dams damage my solar panels?
Answer: Yes, ice dams can put pressure on solar panels and their mounting systems. The weight of the ice and snow can cause damage. Meltwater can also refreeze and get under panel edges.
Question: What is the best type of insulation for my attic?
Answer: For preventing ice dams, blown-in insulation like cellulose or fiberglass is often recommended. It fills gaps well and covers joists, creating a more uniform thermal barrier than batts alone.
Wrap Up
Taking steps to prevent ice dams on your roof in winter months is smart home care. Focus on keeping your attic cold with good insulation and ventilation. Seal up any air leaks that let warm air escape.
Keeping your gutters clean also helps water drain away. By addressing these key areas, you protect your home from damage and costly repairs.
![Home Maintenance Mistakes Cost Homeowners Yearly[1]](https://creativehouseblog.com/wp-content/uploads/2026/05/Home_Maintenance_Mistakes_Cost_Homeowners_Yearly1-1-768x403.jpg)
![Signs Your Heating System Needs Attention[1]](https://creativehouseblog.com/wp-content/uploads/2026/05/Signs_Your_Heating_System_Needs_Attention1-768x403.jpg)
![9 Things You Should Know Before Using A Pizza Oven At Home[1]](https://creativehouseblog.com/wp-content/uploads/2026/04/9_Things_You_Should_Know_Before_Using_A_Pizza_Oven_At_Home1-768x448.jpg)
![How To Clean Your Toaster Safely[1]](https://creativehouseblog.com/wp-content/uploads/2026/03/How_To_Clean_Your_Toaster_Safely1-768x448.jpg)
![Air Fryer Cooking Times Guide Explained Simply[1]](https://creativehouseblog.com/wp-content/uploads/2026/03/Air_Fryer_Cooking_Times_Guide_Explained_Simply1-768x448.jpg)
![How to Build a Home Maintenance Routine You’ll Love[1]](https://creativehouseblog.com/wp-content/uploads/2026/05/How_to_Build_a_Home_Maintenance_Routine_Youll_Love1-768x403.jpg)